Minnie & Mickey Mouse Pumpkin - Dollar Store Halloween Craft
How to transform a dollar store orange foam pumpkin into an adorable Minnie or Mickey Mouse Pumpkin! Simple Disney pumpkin ideas for Halloween that are a must for Disney fans!
Servings 2 pumpkins
Cost $10
Equipment
- Hot Glue Gun
- Scissors
- Black Marker
Ingredients
- Dollar store foam pumpkins 2
- Acrylic craft paint – black red and white
- Black craft foam
- Large white buttons 2
- Ribbon – Red with white polka dots
- Paintbrush
- Round sponge applicator
- Hot glue gun and glue sticks
- Scissors
- Black permanent marker
Instructions
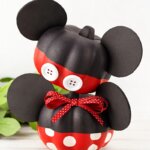
- Coat entire pumpkin with black craft paint. Apply a second or third coat, as needed. Allow paint to dry completely.
- Trace four circles (about 2 ½” in diameter) onto black craft foam and cut out. Attach two circles together with glue, then attach the other two together - to create two ears total. Set aside to dry.
- Paint the bottom half of pumpkin red. Apply a second coat if needed and let dry.
How to Make a Minnie Mouse Pumpkin
- Use your round sponge applicator and white paint to make polka dots on the bottom half of your Minnie Mouse pumpkin. Let dry.
- Trim a small sliver off the bottom of each ear. Glue ears to the top right and top left of pumpkin, pushing the ear toward the pumpkin as the glue sets to secure.
- If the glue shows at the base of the ears, cover with permanent black marker.
- Create the bow by wrapping ribbon around all four of your fingers three times. Carefully remove ribbon from your fingers and tie in the center with a separate 12” length of ribbon to create the tail ends.
- Attach bow to the top center of the Minnie pumpkin with glue gun and then fluff bow loops and trim tails end to prevent fraying.
How to Make a Mickey Mouse Pumpkin
- Repeat steps to make red and black painted pumpkin and mouse ears.
- Use a hot glue gun to attach two large white buttons to the front of your Mickey Mouse pumpkin.