DIY Bookshelf Nativity Scene (Video Tour)
This breathtaking Bookshelf Nativity Scene is an amazing family tradition for Christmas!
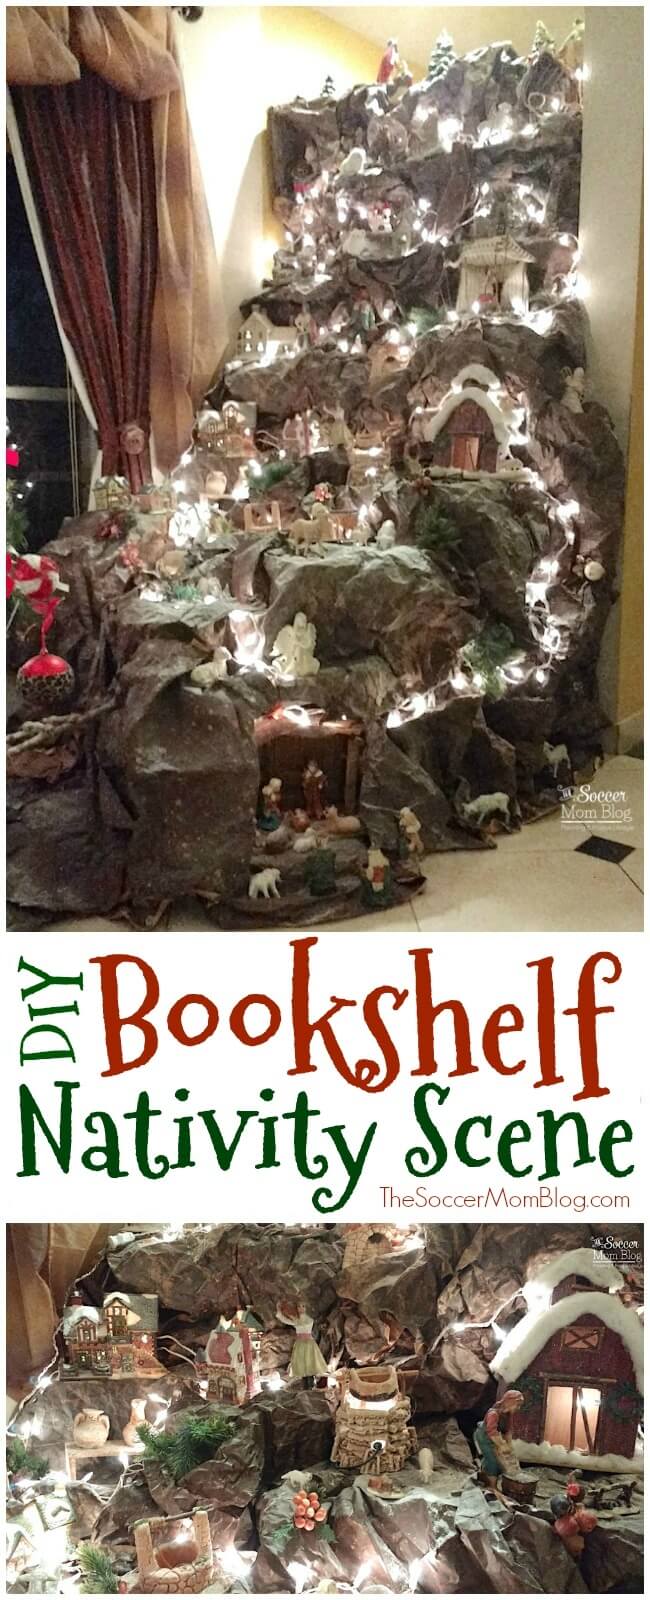
This giant DIY nativity scene is absolutely amazing — Especially when you find out what it’s made with!
Originally published on December 12, 2016.
Believe it or not, this show-stopping Christmas village is made with a bookshelf and simple, up-cycled crafting materials!
Keep reading to find out how to re-create this in your own home, plus a virtual video tour of the entire nativity scene!
Bookshelf DIY Nativity Scene
If you look closer, you’ll see the traditional nativity scene front and center at the bottom near the Christmas tree, rising into a Christmas village in the mountains. The whole thing is actually bigger than the Christmas tree!
My future sister-in-law was trying to describe the setup to me, but it was so hard to picture the grand scale. So, she volunteered to take a video of their Bookshelf Nativity Village.
Once I saw it with my own eyes, I asked if I could share with my readers – it’s just too fabulous not to share with the world!
My sister-in-law’s mom crafted this DIY nativity scene, and generously shared the how-to along with the video so you can recreate this in your own home, or find inspiration for your own!
This bookshelf nativity scene would be an awesome Christmas tradition to start with your family — you could collect new pieces and add to it each year!
I used to love playing with our nativity scene as a kid – I can only imagine how much I would have loved something as amazing as this!
Let’s take a closer look…
DIY Nativity Scene Virtual Video Tour
Related: How to make Colorful Upcycled Wrapping Paper with Cupcake Liners
Bookshelf Christmas Village Supplies
Affiliate links are provided for your convenience in re-creating this Bookshelf Nativity Scene; disclosure policy available here.
- Bookshelf
- Cardboard boxes
- Brown craft paper or paper shopping bags
- Gray paint (using a couple different shades will create a more realistic effect)
- White string lights
- Baby powder
- Nativity figurines
How to create a breathtaking DIY Nativity Scene with a bookshelf
- Pick a corner of your house with a bookshelf.
- Stack boxes cardboard boxes (can be varying sizes: shoe boxes, shipping boxes, etc.) to form a sort of staircase in front of the bookshelf.
- Arrange spare fabric/old clothes on the boxes to soften some places.
- Take very thin brown paper (you can purchase by the roll, or use old paper shopping bags) and splatter paint different neutral tones to create the appearance of rock.
- When paint is fully dry, use your hands to wrinkle up the paper and begin covering the boxes. (TIP: Start by attaching the paper to the top of the bookshelf and working your way down. This Nativity Scene actually covers the front and back of the bookshelf). Attach paper sheets to each other using clothing pins. This will take a lot of paper to cover all of the boxes; the exact amount depends upon the size of your nativity scene. As you work your way down, push paper to form indentions, caves, and varying terrain.
- Run white string lights along the edges of the paper and where the sheets of paper meet to hide any seams or gaps.
- Add figurines, scenery.
- Sprinkle baby powder on the paper and around your figurines to create the effect of snow.
Credit: Photos, video and tutorial courtesy of Jonika Tannous and family.
More of our favorite Christmas crafts and activities:
- Deliciously Fragrant Orange Pomander Ornaments
- Mini Gingerbread House Cakes
- Candy Cane Ice Skate Ornaments
You might also like: 25 DIY Nativity Scenes on Babble

- Beach Day Rice Krispie Treats - June 23, 2026
- Pickled Jalapeños Recipe - June 15, 2026
- Homemade Nesquick Mix - June 11, 2026