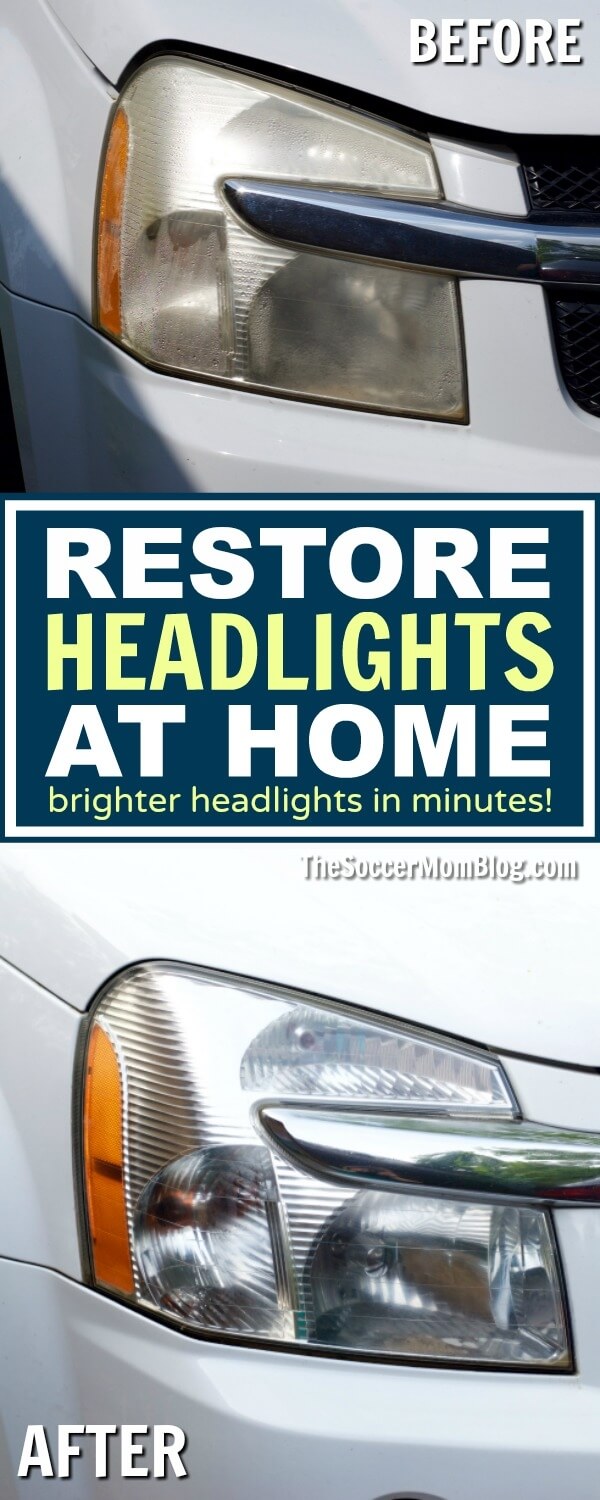
DIY Ghost Candles
Light up your Halloween with these DIY spooky ghost taper candles — an easy craft that adds a touch of eerie charm to your holiday décor.

How To Make Ghost Taper Candles
Looking for a simple and thrifty way to add a little extra spook to your Halloween décor? These DIY ghost taper candles are the perfect project!
All you need are a few basic supplies: plain taper candles from the dollar store, a bowl of hot water, and a couple of permanent markers. That’s it! No fancy tools or expensive craft kits required.
The magic happens when you soften the taper candles in hot water. This makes them flexible enough to bend and shape into fun, wavy designs that look just like dancing little ghosts. Once you’ve got the shapes just right, a quick doodle of ghostly faces with a permanent marker brings them to life.
It’s such an easy craft that anyone can do, and the finished candles look like something straight out of a spooky boutique. Whether you use them as a centerpiece for your Halloween table or place them around the house for a haunting glow, these ghost candles are sure to be a hit.

Supply List
For your convenience in recreating this project, I’ve included shop-able ad links for some of the products used; disclosure policy available here.
- 4 Cups Hot Water (about 190°F)
- White Taper Candles
- Large Glass Baking Dish
- Parchment Paper
- Paper Towels
- Rubber Gloves (you want them to be somewhat heat-resistant)
- Black Permanent Marker
Instructions
- Soak the Candles – Place the candles into the baking dish, then pour the water inside. If the candles shift and start touching each other, move them apart. Allow the candles to soak in the hot water for 10 minutes.
- Shape the Candles – Using rubber gloves, bend and shape the candles so they are wavy instead of straight. While the wax is still soft, smooth out any fingerprints you might have made.
- Dry – Place the shaped candles on top of a sheet of parchment paper and gently pat dry with paper towels. Allow to set until completely dry and the wax has re-hardened.
- Decorate – Use a permanent marker to draw eyes and a mouth on your ghost candles.

Prep Tips
- Water Temperature – The sweet spot for the water temperature is about 190°F. I tried 200°F, but it was a bit too hot and caused the candles to melt more than I wanted. After soaking for about 10 minutes, the candles should be soft and bendable. If they’re still stiff, the water likely wasn’t hot enough. Just reheat the water and let them soak a little longer until they’re flexible. If they don’t bend easily, you don’t want to force it, or they may snap in half.
- Safety – Be sure to always use gloves because not only will they help protect your hands from the hot water, but also the wax. You can use heat-safe food prep gloves or dishwashing gloves (look for ones that are flexible so you can work easily).
- Cleanup – If any wax gets stuck to the baking dish, simply pour in more hot water to melt. Do not pour the wax down the drain.

More Halloween Crafts
- Laundry Jug Jack-O-Lanterns
- Mickey & Minnie Pumpkins
- Halloween Sensory Bottles — 3 designs!
- Toilet Paper Pumpkins
Ghost Candles Instructions (Printable Directions)
If you tried this craft and liked it, please rate it!
Want to Save This Recipe?
Enter your email & I’ll send it to your inbox. Plus, get great new recipes from me every week!
By submitting this form, you consent to receive emails from The Soccer Mom Blog

DIY Ghost Candles
Equipment
- 4 Cups Hot Water (about 190°F)
- White Taper Candles
- Large Glass Baking Dish
- Parchment paper
- Paper Towels
- Rubber Gloves
- black permanent marker
Instructions
- Place the candles into the baking dish, leaving space between each one, then pour the water inside. If the candles shift and start touching each other, move them apart.
- Allow the candles to soak in the hot water for 10 minutes.
- Using rubber gloves, bend and shape the candles so they are wavy instead of straight.
- While the wax is still soft, smooth out any fingerprints you might have made.
- Place the shaped candles on top of a sheet of parchment paper and gently pat dry with paper towels.
- Allow to set until completely dry and the wax has re-hardened.
- Use a permanent marker to draw eyes and a mouth on your ghost candles.
Notes
- Water Temperature – Aim for 190°F. Hotter water (200°F+) can melt too much wax. Soak about 10 minutes until bendable; reheat water if needed. Don’t force bends or candles may snap.
- Safety – Wear heat-safe gloves to protect your hands from hot water and wax. Flexible gloves work best.
- Cleanup – To remove wax, add hot water to melt it. Never pour wax down the drain.
Pin this ghost candle craft on Pinterest:

You might also like:
Halloween Potion Bottle Decorations

- Beach Day Rice Krispie Treats - June 23, 2026
- Pickled Jalapeños Recipe - June 15, 2026
- Homemade Nesquick Mix - June 11, 2026