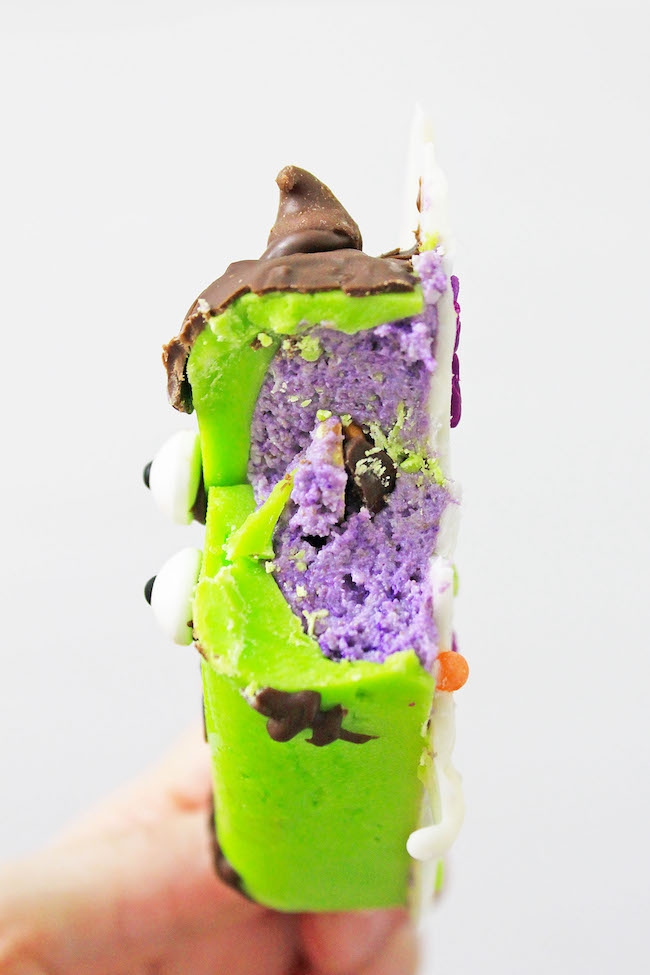
These Frankenstein Halloween Cake Pops are super cute, slightly spooky, and SO much fun! A wow-worthy Halloween party treat!
Frankenstein Cake Pops
During the holiday seasons, we don’t have as much time to bake fun treats as we’d like. Between parties and school events that come up with little notice, it can be tempting to skip the whole special holiday treat altogether. Instead of missing out on a spooky treat, we found an easy recipe that you can make for your kids or their school Halloween parties!
These Cakesicles are not only a fabulous idea for a great Fall treat, but they’re also delicious too! They’re cake and frosting dipped in chocolate and who wouldn’t love that at a Fall party, or just a great little snack on a stick when you need something sweet. No matter when you decide to serve them or eat them, you’re going to love them, we promise! These will be a favorite. If you’re in a pinch, you can even use a boxed cake mix!
Related: Check out our Halloween Marshmallow Pops too! There are 5 designs, one of them is Frankenstein!
Affiliate links provided for your convenience in re-creating our Frankenstein Cakesicles recipe; read disclosure policy here.
Halloween Cake Pops Ingredients
For the cake:
- 3 cups of flour
- 1 Tablespoon of baking powder
- 1 Tablespoon of baking soda
- 1/2 teaspoon of salt
- 2 1/4 cups of sugar
- 2 sticks of butter
- 2 eggs
- 1 1/3 cups of milk (you can use Soy, or Almond, or whatever you prefer)
- 1 teaspoon of Vanilla
- Purple food coloring gel
TIP: If you’re in a hurry, you can use boxed cake mix to save time.
For the frosting:
- 2 sticks of butter
- 4 cups of powdered sugar
- 1/2 cup of milk
- 1 teaspoon of vanilla
- Purple food coloring gel
For the candy coating:
Kitchen Tools Used
- Stand mixer
- Cakesicles mold
- 9 x 13 pan
- Frosting decorating bag with tips
- Fall colored sprinkles (optional)
How to Make Frankenstein Cake Pops
Before we get started, I just want to note that while the instructions look pretty long, these Halloween cake pops are not as tricky to make as they might seem. If you’ve ever made cake pops, the basic idea is the same. I just wanted to make sure that we provide detailed instructions for every step!
Preheat oven to 350°F and grease a 9 X 13 cake pan.
For the cake:
- In the mixing bowl of a stand mixer, with the whisk attachment, cream the butter and sugar until light and fluffy.
- Add the vanilla, food coloring, and eggs, and mix until completely blended.
- In a separate bowl, mix together the flour, salt, baking soda, and baking powder.
- Alternate adding the flour mixture and the milk to the mixing bowl, mixing on low speed, until all ingredients have been added.
- Mix on high for about 1 minute to make sure all ingredients are well incorporated.
- Turn off the mixer, scrape down the sides of the bowl with a spatula, and stir into the batter.
- Pour batter into prepared cake pan and bake at 350 degrees for 30 – 40 minutes, or until a toothpick inserted in the center comes out clean.
- Remove to a wire rack to cool.
Remember, you can always use a box cake mix to save time!
For the frosting:
- Combine 2 sticks of softened butter, milk, and vanilla to the mixing bowl with stand mixer or electric hand mixer.
- Add a few drops of food coloring gel and mix.
- Add the powdered sugar a little at a time, mixing on low speed until all the sugar has been added. If needed, add more food coloring and mix until you have the desired shade of purple.
- If frosting is not thick enough, add a little more powdered sugar until a thick consistency is achieved.
- Keep frosting in fridge until cake is ready.
- When the cake is cool, break it into crumbs right in the pan in which it was baked.
- Add a cup of frosting at a time, and stir the cake and frosting together until you have a big ball of cake and frosting that sticks together. (You want it to be thick so that it will hold its form in the cakesicle molds, but don’t overdo it!)
To Assemble:
- In the microwave, melt 3 squares of the white chocolate almond bark in a microwave-safe bowl in 15-second intervals. Stir in between each heating interval until smooth.
- Add the green food coloring gel and mix until you have a bright, even green.
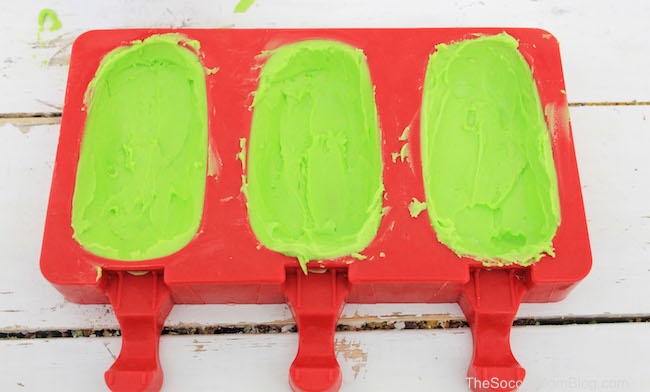
- Spoon the green chocolate into the cakesicle molds, and turn the molds a little sideways in both directions to coat the inside of the molds with chocolate.
- Place the molds in the freezer for 30 minutes to allow the chocolate to set.
- When chocolate is set, place a heaping Tablespoon of the Cake/frosting mixture into the mold, and form the cake pop.
- Add more of the cake/frosting mixture, until all the molds have been filled.
- Insert the sticks in the cake mixture, using the mold as a guide.
- Pop the green chocolate back in the microwave for a few seconds, and stir to make sure it’s smooth, and spoon onto the Cakesicles with a spatula to cover the mold in the green-colored white chocolate.
- Place the mold in the refrigerator for about an hour to completely set the white chocolate.
- When chocolate is set, remove the Cakesicles from the molds, and place them on a parchment paper-lined cookie sheet.
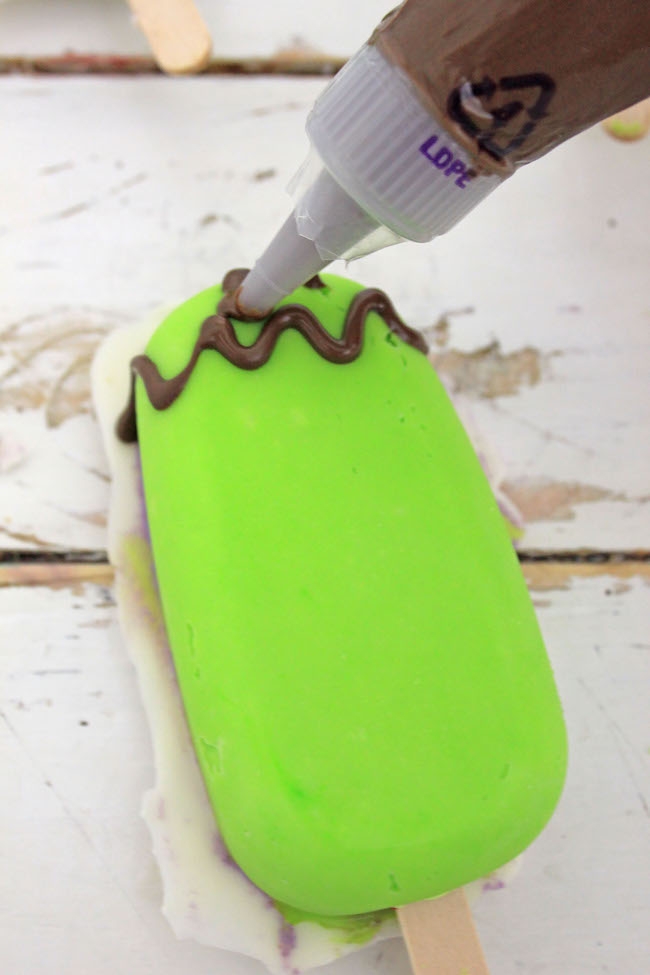
- Melt 3 squares of Chocolate Almond Bark in the microwave in 10-second intervals, and stir the chocolate to make sure it’s smooth.
- You can either place the chocolate in a squeeze bottle with a tip, or in a pastry bag with a fine tip, to decorate the face of the Cakesicles.
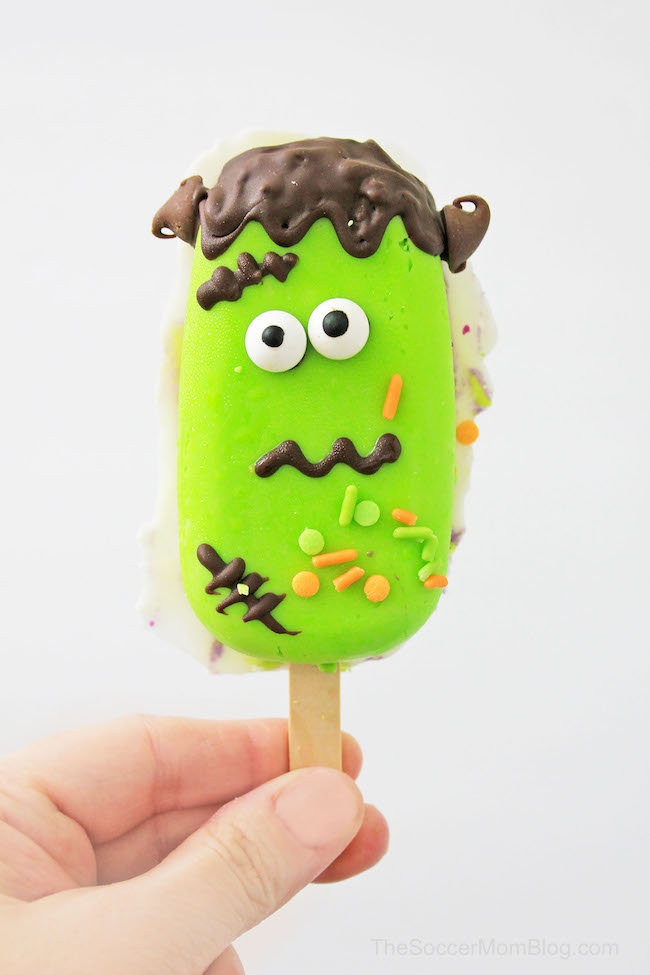
You can decorate Frankenstein’s face however you like, or use or photos as a guide. Have fun with it!
TIP: Use chocolate like “glue” to hold the edible eye candies in place.
When all the faces are decorated, place the cookie sheet in the refrigerator for about an hour to allow the chocolate to set.
Serve immediately, or place in a single layer in an airtight container, and keep refrigerated until time to serve.
[convertkit form=4956168]
More Halloween Recipes
- Jack Skellington Pull-Apart Cupcakes
- Peanut Butter Candy Corn Treats
- Creamsicle Flavored Mini Halloween Cupcakes
- Spiderweb Cookies
- Halloween Cookies with Witches Brew Frosting Filling
Grab a free printable copy of our Frankenstein Cake Pops Recipe:
If you like this recipe, please rate it! We’d also love to hear your thoughts in the comments below.
Want to Save This Recipe?
Enter your email & I'll send it to your inbox. Plus, get great new recipes from me every week!
By submitting this form, you consent to receive emails from The Soccer Mom Blog
Frankenstein Halloween Cake Pops
Equipment
- Electric mixer
- Cakesicles Mold
- 9 x 13 pan
- Spatulas
- Microwave
- Pastry bag, squeeze bottle, or plastic food bag
- Fall colored sprinkles (optional)
Ingredients
For the cake
- 3 Cups Flour
- 1 Tbsp Baking Powder
- 1 Tbsp Baking Soda
- 1/2 tsp Salt
- 2 1/4 Cups Sugar
- 2 Sticks Butter
- 2 Eggs
- 1 1/3 Cups Milk you can use Soy, or Almond, or whatever you prefer
- 1 tsp Vanilla Extract
- Purple Gel Food Coloring
For the frosting
- 2 Sticks Butter
- 4 Cups Powdered Sugar
- 1/2 Cup Milk
- 1 tsp Vanilla Extract
- Purple Gel Food Coloring
For the coating
- White Chocolate Almond Bark melted
- Green Gel Food Coloring
- Candy Eyes
Instructions
For the cake:
- Cream together the butter and sugar until light and fluffy.
- Add the vanilla, food coloring, and eggs, and mix until completely blended.
- In a separate bowl, combine the flour, salt, baking soda, and baking powder.
- Alternate adding the flour mixture and the milk to the mixing bowl, mixing on low speed until all ingredients have been added.
- Mix on high for about 1 minute to make sure all ingredients have been well incorporated.
- Turn off the mixer and scrape down the sides of the bowl with a spatula, and stir the batter.
- Grease the bottom and sides of a 9 X 13 pan, then pour the cake batter into it.
- Bake at 350 degrees for 30 – 40 minutes, or until a toothpick inserted in the center comes out clean.
- Remove to a wire rack to cool.
For the frosting
- With stand mixer, blend 2 sticks of softened butter, milk, and vanilla.
- Add a few drops of purple food coloring gel, and mix until evenly colored.
- Add the powdered sugar a little at a time, mixing on low speed between additions until all the sugar has been added.
- Scrape the sides off the bowl, and blend again. If frosting is not thick enough, add a little more powdered sugar until a thick consistency is achieved.
- Chill frosting in fridge while cake bakes/cools.
- When the cake is cool, break up the cake into crumbs right in the pan it was baked in.
- When the cake is crumbs add about a cup of the frosting at a time, and stir the cake and frosting together until you have a big ball of cake and frosting that sticks together.
To Assemble
- In the microwave, melt 3 squares of the White Chocolate Almond bark in a microwave-safe bowl in 10-second intervals. Stir until smooth.
- Add the Green food coloring gel and mix until the chocolate is all the same color, with no streaks of white.
- Spoon the green chocolate into the Cakesicle molds, and turn the molds a little sideways in both directions to coat the inside of the molds with chocolate.
- Place the molds in the freezer for 30 minutes to allow the chocolate to set.
- When chocolate is set, place a heaping Tablespoon of the Cake/frosting mixture into the mold, and form the Cakesicle
- Add more of the cake/frosting mixture, until all the molds have been filled.
- Insert the sticks in the cake mixture, using the mold as a guide.
- Pop the green chocolate back in the microwave for a few seconds, and stir to make sure it’s smooth, and spoon onto the Cakesicles with a spatula to cover the mold in the Green colored white chocolate.
- Place the mold in the refrigerator for about an hour to completely set the white chocolate.
- When chocolate is set, remove the Cakesicles from the molds, and place them on a parchment paper-lined cookie sheet.
- Melt 3 squares of Chocolate Almond Bark in the microwave in 10-second intervals, and stir the chocolate to make sure it’s smooth.
- You can either place the chocolate in a squeeze bottle with a tip, or in a pastry bag with a fine tip, to decorate the face of the Cakesicles.
- When all the faces are decorated, place the cookie sheet in the refrigerator for about an hour to allow the chocolate to set.
- Serve immediately, or place in a single layer in an airtight container, and keep refrigerated until time to serve.
Notes
Nutrition
You might also like:
- Paper Chain Octopus Craft - April 24, 2024
- Amish Sugar Cookies - April 19, 2024
- Marshmallow Playdough - April 18, 2024





Leave a Reply