
How to Set Up a WordPress Blog in 15 Minutes
Learn how to set up a Wordpress blog the RIGHT Way with our comprehensive FREE guide! We’ll break it down into 5 easy steps that anyone can follow so you know exactly what to do from the beginning!
EDIT: For a limited time, you can start a blog for as low as $2.95 per month for 12 months. (That’s only $35.40 for the entire year!) Hurry, this deal ends SOON. PS – you also get a free domain name ($15 value) when you sign up for a year’s hosting with Bluehost!
I’ve included affiliate links for products/services that I use and love and that might be helpful for you too; read my disclosure policy here.
So You’ve decided to start a blog.
You’ve done some research. You’ve read success stories.
You’re excited!
…and you’re thoroughly confused…
Starting a blog is surprisingly simple — you can be up and running in minutes! However, there are a LOT of different options and advice out there. Some better than others…
Blogging turned out to be a tremendous blessing for our family, so I love to help other new bloggers get started on this exciting journey. I write frequently about what I’ve learned along the way, but I realized recently that I haven’t ever written about the technical part of creating a blog.
That’s why I created this step-by-step guide to set up Wordpress blog.
From choosing your host, to installing Wordpress, to writing your first post. It’s all here in my free quick start guide! So let’s get started!
How to Set Up a Wordpress Blog
What’s covered:
- Self-hosted vs. free blogging platforms
- Why I recommend Bluehost hosting
- Purchasing your domain name and hosting plan
- How to install Wordpress with Bluehost
- How to login to your Wordpress dashboard
- Customizing your blog
- Write your first post
- Recommended plugins
- and more!
Let’s Talk: Self-Hosted vs. Free Blogging Sites
If you’re still in the planning stages, I’ll briefly explain the difference between free blogging sites and self-hosted (paid). I’ll also explain why I recommend starting with a self-hosted blog from the get-go.
When I created my blog, I started on Wordpress.com, which is a common free blogging platform. What I didn’t know is that there is also Wordpress.org, or that there is a difference between the two. Wordpress.org is also a free platform — but you need to purchase your own domain name and web hosting.
Key Terms
- domain name – your website’s address, also known as a “URL”
- web hosting – this is the service that stores your website content and delivers it to your visitors on demand
Why I recommend starting with a self-hosted blog over a free blogging platform
- Most free sites won’t let you have ads or do sponsored posts, so if you have the goal of monetizing your blog, you’re going to need to be self-hosted.
- A self-hosted blog gives you control over your content, and you don’t risk losing everything if that platform closes or decides to shut down your site for any reason (rare, but it does happen).
- If you start with self-hosted, you won’t need to pay to switch over later or try to figure out how to do it on your own.
Why I recommend Bluehost web hosting for blogs
- Number one — I use it. I’ve been with Bluehost since I became self-hosted. I wouldn’t recommend a service that I don’t use and love myself.
- Price — Let’s keep it real, as a new blogger you’re trying not to spend much money! In fact, one thing I tell every new blogger I talk to: keep your costs as low as possible for as long as possible. Bluehost has the most affordable rates I’ve seen for what you get (only a few bucks a month – less than one cup of premium coffee). Even better, they created a special offer just for my fans and blogging students that’s even LOWER than their advertised rate! CLICK HERE to check out this special price for readers of The Soccer Mom Blog.
PS- Your domain name is FREE when you sign up for a Bluehost web hosting plan!
- Service — The Bluehost “basic” plan easily handles serious traffic. I stayed with this starter plan until I hit about 150,000 page views a month. That’s a lot of traffic! At that point I updated to their “blogger” plan, which is still affordable compared to industry averages. My other favorite thing about Bluehost is their 24 hour customer service line, so I can call any time of day or night. I’ve stopped issues/attacks in their tracks because I was able to get immediate help.

STEP 1 — Purchasing your domain and hosting
If you haven’t done so yet, this is your first step. Choosing a domain name is a big decision, so make sure it is a name that will still represent you years down the road.
- For more tips on brainstorming your blog and brand, check out my post How to Start a Blog from the Ground Up in 10 Steps

If you decide to go with Bluehost as well, CLICK HERE to see the special offers available just for my readers. Then click on the big green button that says “get started now.” This will take you to the screen where you select your plan:
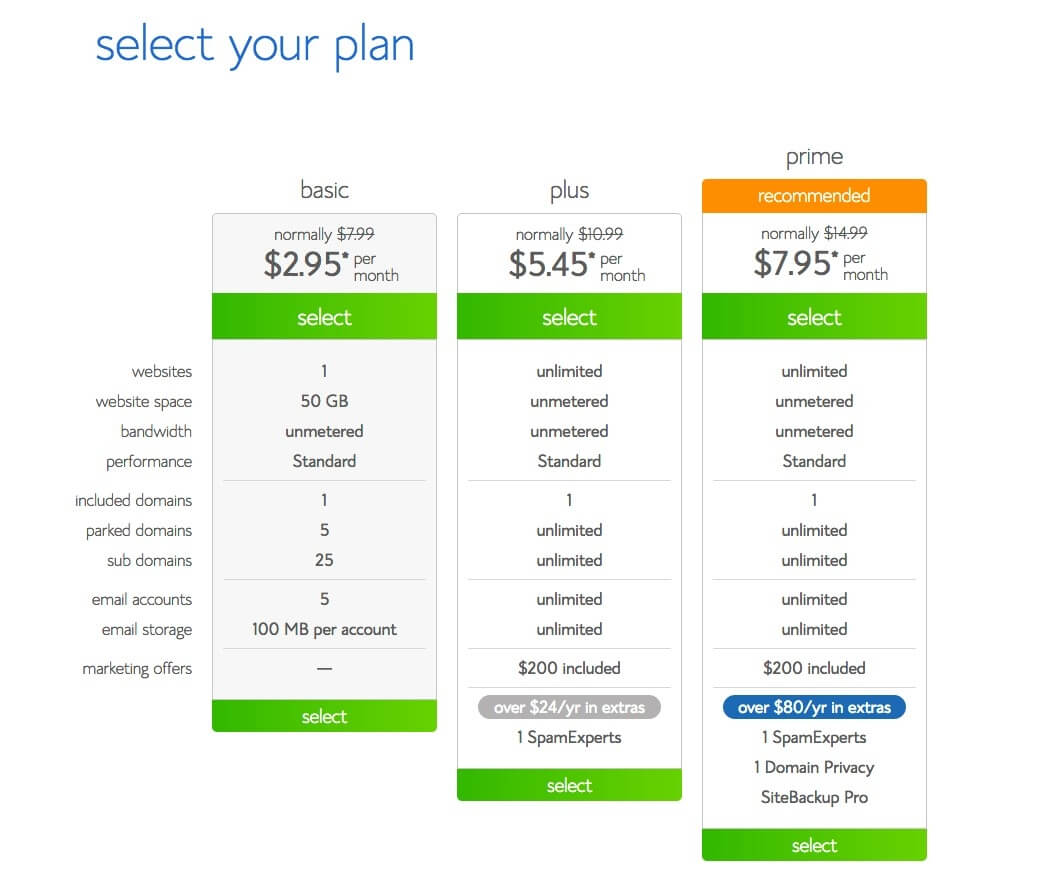
For new blogs, I recommend the “basic” plan. This keeps your costs low and still provides plenty of power for your new site as it grows. You can always upgrade later when your site takes off!
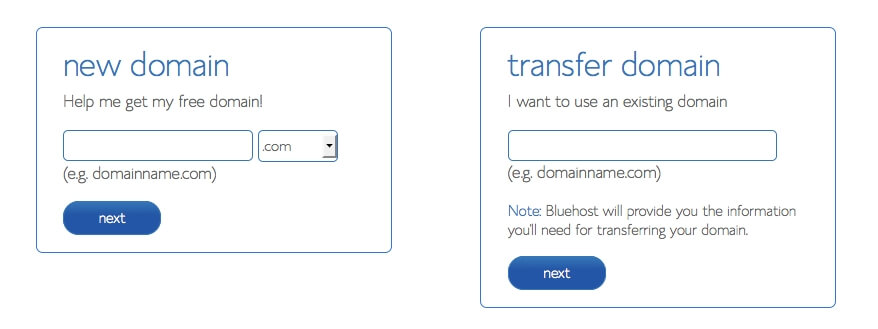
Once you select your plan, you’ll be prompted to choose your FREE domain name:
Next, you can select additional services. Some of these aren’t necessary, but I do recommend Domain Privacy Protection and Site Backup Pro.
Domain privacy protection hides your personal information, so a proxy address is displayed in the public registry.
Site backup pro allows you to set automatic back-ups of your website (even daily), so you can restore your site if necessary.
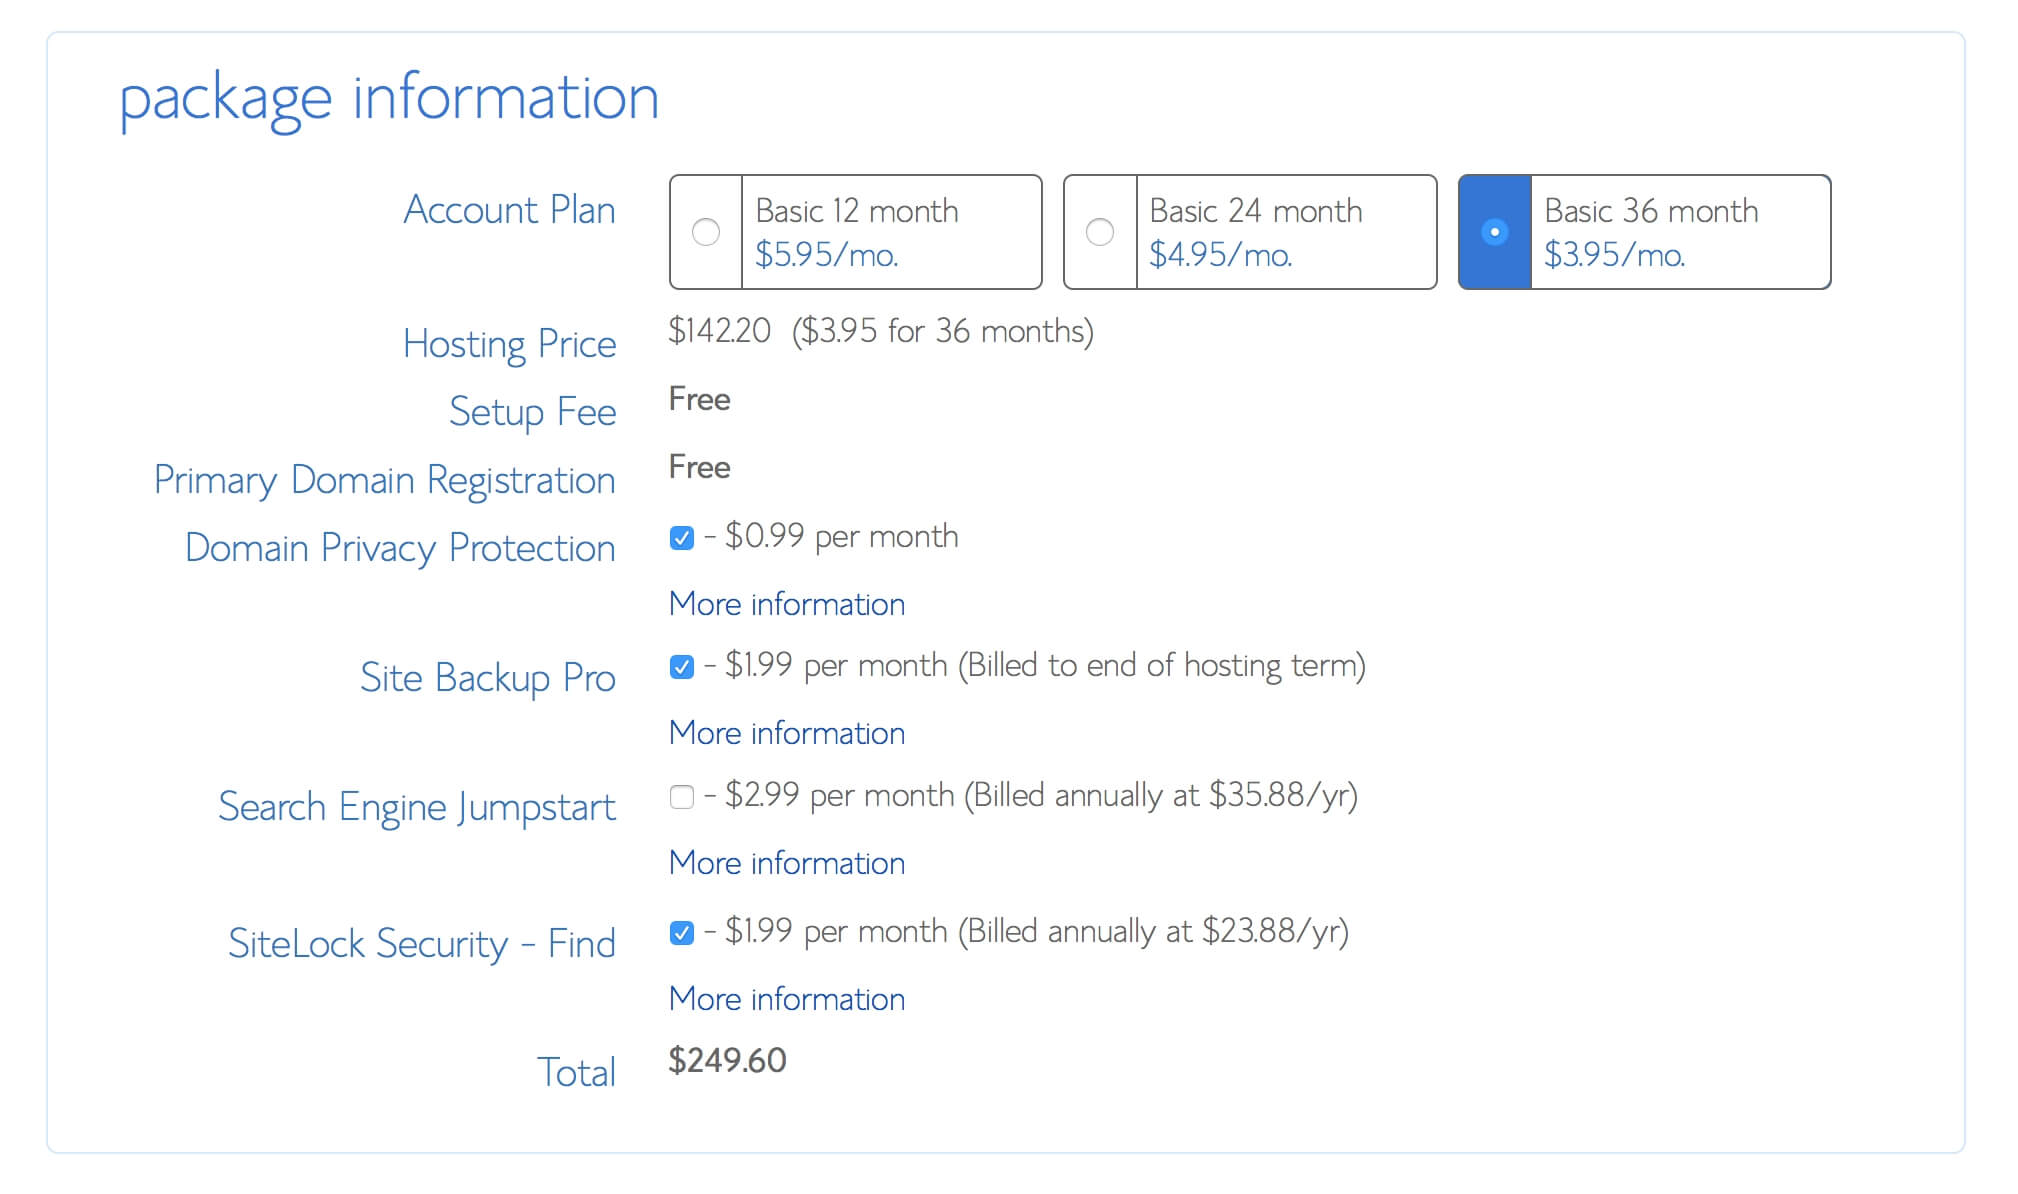
Finally, you complete your payment information to secure your domain and web hosting for 1-3 years. (Bluehost will notify you near the end of your term when it’s time to renew). Even though you pay for your your hosting up front, if for any reason you decide to cancel, Bluehost will refund a prorated amount for the time left on your plan. So breathe easy, and let’s get started!
STEP 2: How to Install Wordpress with Bluehost
After you purchase your hosting/domain, check your inbox for a welcome email from Bluehost. This email will provide a link to your cPanel, where you can install WordPress.
There are a lot of colorful buttons in cPanel, but look for the one under “Website” heading that says “Install Wordpress.” (You won’t ever need to use most of these other buttons and you’ll rarely need to access your cPanel at all after this).
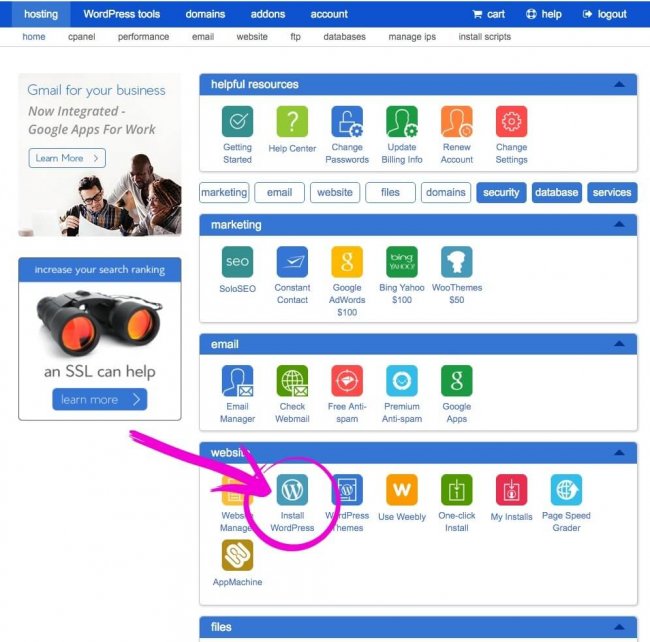
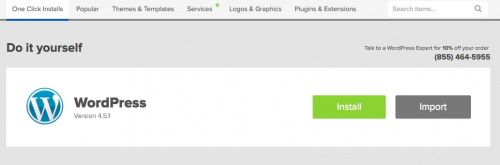
Click the green INSTALL button:
Choose your domain name from the drop-down menu. You’ll then be prompted to create a user name and password for WordPress.
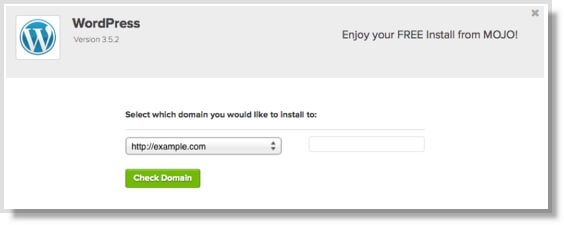
IMPORTANT: When creating your Wordpress login name, go with something original and NOT associated with your blog. Don’t choose “admin” as this is the first thing hackers will try! A password with at least 10 characters and that is a combination of uppercase, lowercase, numbers, and symbols is a must. Be sure to write down your user name and password somewhere safe, as your password could be difficult to remember (that means it’s strong!)
If asked, select the option that says “automatically create a new database for this installation” and then click the “Install Now” button. If you’re confused or have any issues, call Bluehost’s support line and they’ll talk you through the process.
STEP 3: Login into your Wordpress blog for the first time
To access your Wordpress dashboard for the first time, type your domain name into the address bar of your browser, adding “/wp-admin” to the end of it. So it will look like this:
http://yourdomainname.com/wp-admin
Now you’ll be taken to the screen where you login to your blog dashboard with the user name and password your created during the installation process. Bookmark this page!
STEP 4: Customize your blog
Now the fun part! Before writing your first post, you’ll want to make your new blog your own. Here are things you can do with the menu on the left of your screen (the black sidebar with white text):
- Choose a theme — From the menu on the left, choose “Appearance” -> “Themes”. This will take you to a marketplace where you can browse thousands of themes for your blog. I recommend starting with a free theme until you get used to Wordpress and figure out the features that are important to you. Later you can upgrade to a premium theme that best meets your needs. When you find a theme you like, click “Install” and then “Activate” on the theme preview.
- Upload a header image — This is the image at the top of your blog that announces your blog name, and possibly a tagline. When I started my blog, I actually made my own header with a basic photo editing program. It doesn’t need to be fancy; the most important thing is that it is readable and fits your theme. (When you click “Appearance” -> “Header” it should tell you the recommended header image size for your specific theme). Try PicMonkey.com for a free online editing program.
- Adjust settings — The settings menu will allow you to customize the functionality of your website, like moderating comments before they appear on your site (I recommend this to help prevent spam) or setting up sharing buttons (do this!) Take a few minutes to explore the settings menu and see all of the available options.
STEP 5: Write your first post
In the dashboard menu to the left of your screen, select “Posts” -> “Add new”
This will open your post editor, by default it will be your visual editor. You can toggle between the visual editor and text editor (where you can add/view HTML) with the tabs at the top right of the form.
Your editor may look slightly different depending on the theme and version of Wordpress that is installed. However, most of the functionality is the same.
The screenshot below shows some of the options you might want to use when creating a post:
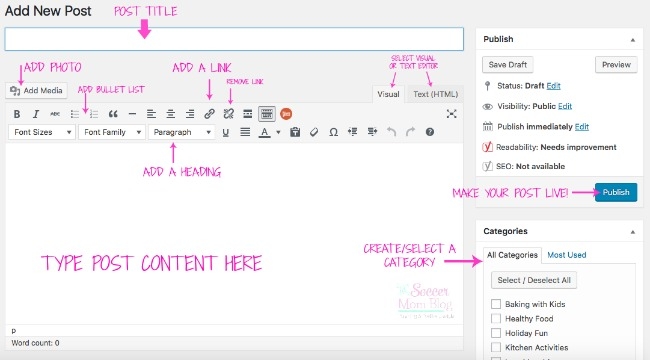
To make your post public, or “live,” click the PUBLISH button. And now you’re officially a blogger!
Read more about how to write your first post with this guide from My Think Big Life.
5 Quick Tips:
Learn More: 5 things I wish I had known before starting a blog
Tips for Building a Blog the Right Way
You might have already done some research about blogging and seen some conflicting or confusing information. Below are some of the most common things new bloggers ask me about — if some of these tips don’t make sense yet, that’s ok! But I want to put them out here so when you come across these topics you’ll be familiar with them.
- Readability is key — It’s easy to get carried away with customizations, fonts, colors, etc. However, the most important thing to think about: can visitors easily read my blog? That’s what they’re there for after all! Keep colors and fun fonts to accents only, and use sparingly. Your readers will thank you for it, and they’ll stick around longer if your site is clear, easy to navigate, and a pleasure to read.
- Stick with themes that are “responsive” — This means a theme is designed to automatically detect whether a reader is viewing on a desktop, phone, etc. and adjust the display accordingly. A responsive theme may rank higher in mobile search results. When choosing a theme, look for this in the specifications.
- Don’t edit any files that end with “.php” — This might not mean anything to you right now, but if you research things to do with your blog, some suggestions might tell you to update code or files. If you don’t know what that means, don’t do it! Messing with files or codes when you don’t quite understand what you’re doing can lead to bad results or the dreaded “white screen of death.” (Been there, done that…oops!)
- Go easy on the plugins — Some plugins add useful features to your blog. However, plugins can also slow down your site or cause conflicts if they are poorly coded or not updated regularly. Try to keep it simple and you’ll have a faster and healthier blog.
Plugins I recommend for new blogs
- Akismet — filters spam comments
- TinyPNG — automatically reduces image files sizes to speed up your site load time
- Wordfence — security plugin (the free version is fine to start)
- Yoast — SEO plugin that allows you to choose a focus search keyword, edit social media titles, and your search engine description (snippet). It sounds complicated, but is pretty self explanatory – simply fill in the blanks!

More Blogging Tips for Beginners
- Get your FREE blog progress tracker
- How to Start Making Money Blogging…even as a Beginner
- Blogging Etiquette – What ALL Bloggers Need to Know
- What to do when Someone Plagiarizes Your Blog
- Triple Your Blog Traffic in One Month
Click here to see all the blogging tip blog posts from The Soccer Mom Blog

- Beach Day Rice Krispie Treats - June 23, 2026
- Pickled Jalapeños Recipe - June 15, 2026
- Homemade Nesquick Mix - June 11, 2026


I’ve been snooping around your blog for a while and it has inspired me to start my own. I’ve only started today but your tips have been super useful for getting started, I’m using wordpress and the bluehost plan you have suggested and it really is that simple! Thank you so much for the advice! 🙂
Awesome!! Glad the posts were helpful for you 🙂