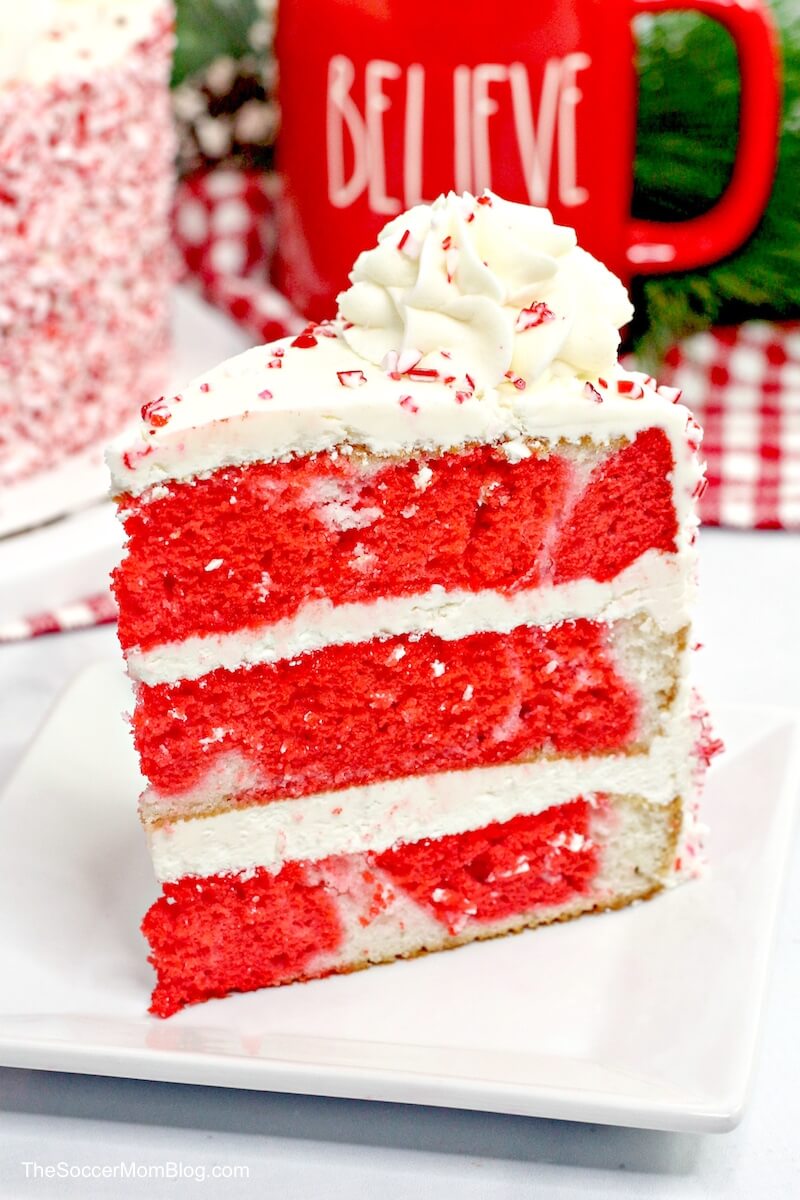
Christmas Cheesecake
This red and green Christmas Cheesecake is a fun, festive, and delicious holiday dessert! This no bake peppermint cheesecake is both gorgeous and easy!
No Bake Christmas Cheesecake
It’s hard to pick a favorite holiday dessert, but this lovely Christmas cheesecake is in the running!
One of the reasons I love this Christmas cheesecake recipe is because it is an easy no bake cheesecake. It does take a bit of time, but most of that time is spent chilling/freezing and not actual cooking/work time. So it’s easy enough for a novice – like me!
If you are looking for a festive cheesecake for Christmas day, then you’ve got to try this easy peppermint cheesecake!
You and your guests are going to love the colorful layers, the smooth peppermint flavor, the candy crunch, and the rich brownie crust. You just can’t go wrong with this one!
This is one of the best peppermint cheesecake recipes ever and makes a beautiful way to end a meal, or to bring out with coffee, or after dinner cordials. No matter what you choose to serve this with, your guests will be glad you did!
Related: Try our delicious Gingerbread Cheesecake and our Christmas Lasagna Dessert too!
I’ve provided this quick list of shop-able ingredients for your convenience; disclosure policy here.
What You Need to Make Christmas Cheesecake
For the Crust:
- 1 box brownie mix
For the Filling:
- 6 blocks cream cheese
- 1 cup heavy whipping cream
- 1/2 cup granulated sugar
- 1 Tablespoon corn starch
- 2 1/2 cups powdered sugar
- 2 Tablespoons vanilla extract
- 1/2 teaspoon peppermint extract
- 1 Tablespoon lemon juice
- Neon Pink gel food coloring
For the Topping:
Kitchen Tools:
- 9-inch spring-form pan
- Parchment paper
- Electric mixer or Stand mixer
- Rolling pin
- Gallon freezer bags
- Non-slip mixing bowls
How to Make No Bake Peppermint Cheesecake
For our Christmas cheesecake, we made a brownie crust, which is baked. However, the actual peppermint cheesecake itself is a no bake cheesecake.
If you’d like the entire recipe to be no-bake, you can take a pre-made graham cracker crust and fit it to your springform pan before assembling your cheesecake.
To make our brownie crust, we baked half a box of pre-made brownie mix in a springform pan lined with parchment paper.
While crust was baking, we made our peppermint cheesecake batter:
- Blend all cream cheese until smooth, then add 1 cup heavy whipping cream and continue mixing.
- Add the granulated sugar, vanilla, and lemon juice, and blend until smooth.
- Mix the corn starch and powdered sugar in a small bowl, then add to the cream cheese mixture a little at a time. Alternate this cornstarch/sugar mixture with remaining cream, until all the cream and powdered sugar have been added.
- Turn the mixer on high, and mix for about 2 minutes, until the cheesecake filling is smooth and creamy.
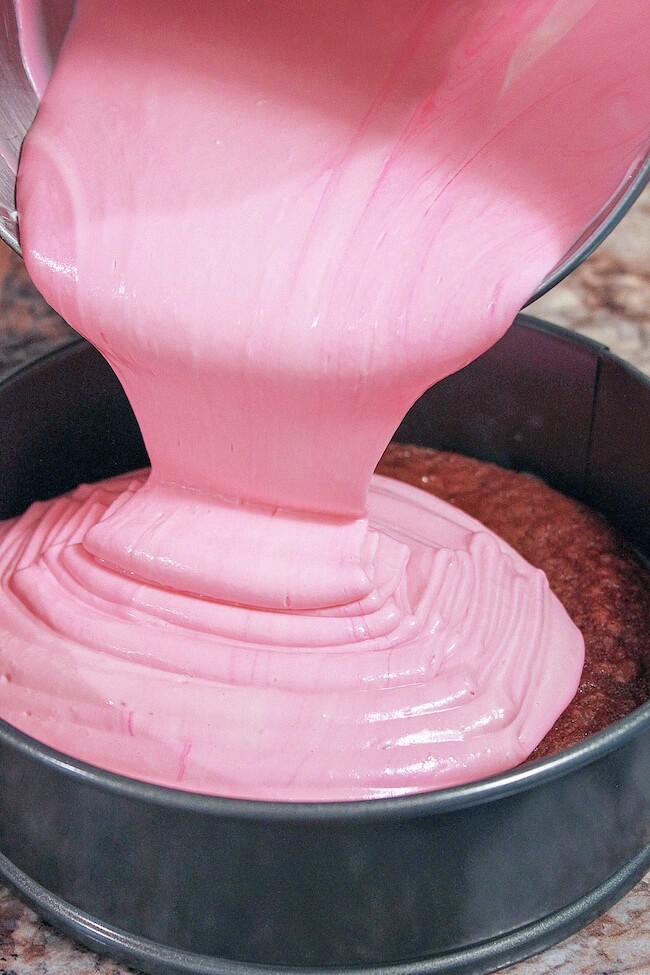
Divide your cheesecake batter in half, keeping half of the batter white and adding food coloring to make the other bowl of batter a rich pink color. Add peppermint extract and whisk.
Pour the pink batter into springform pan on top of brownie crust and freeze for 3-4 hours. Keep white batter in bowl in fridge.
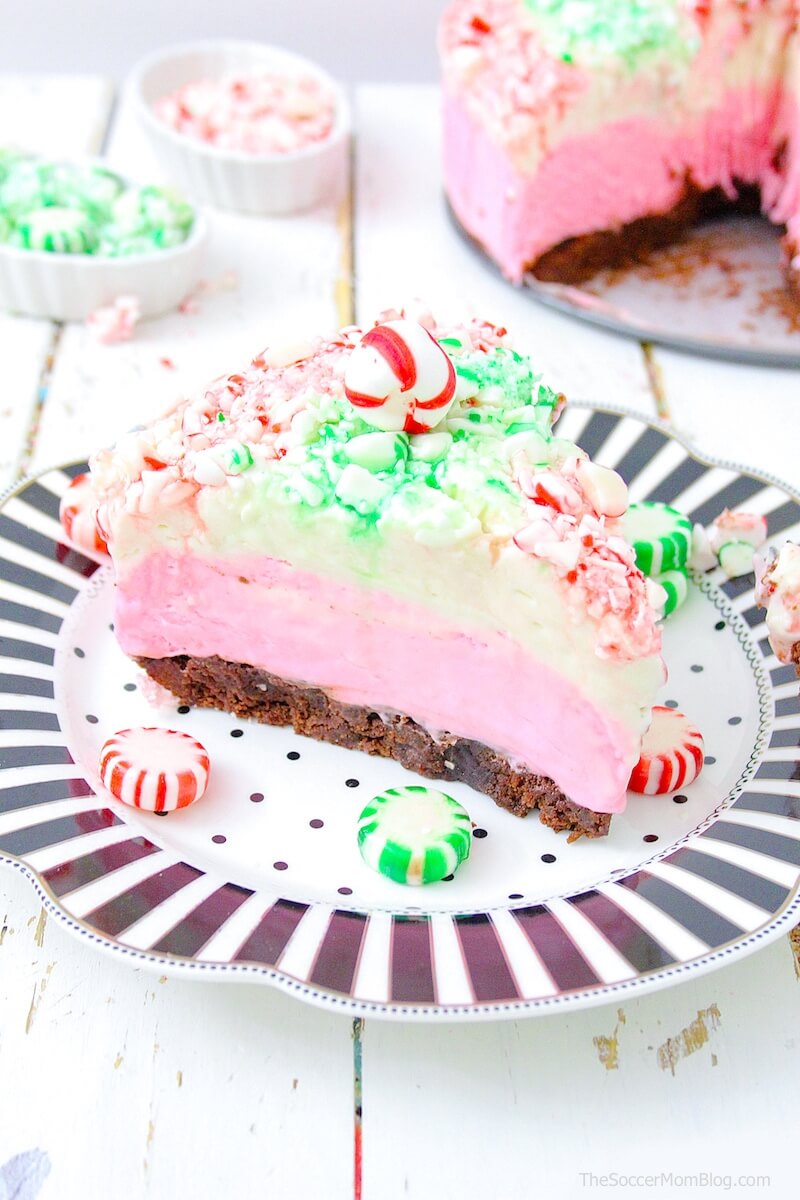
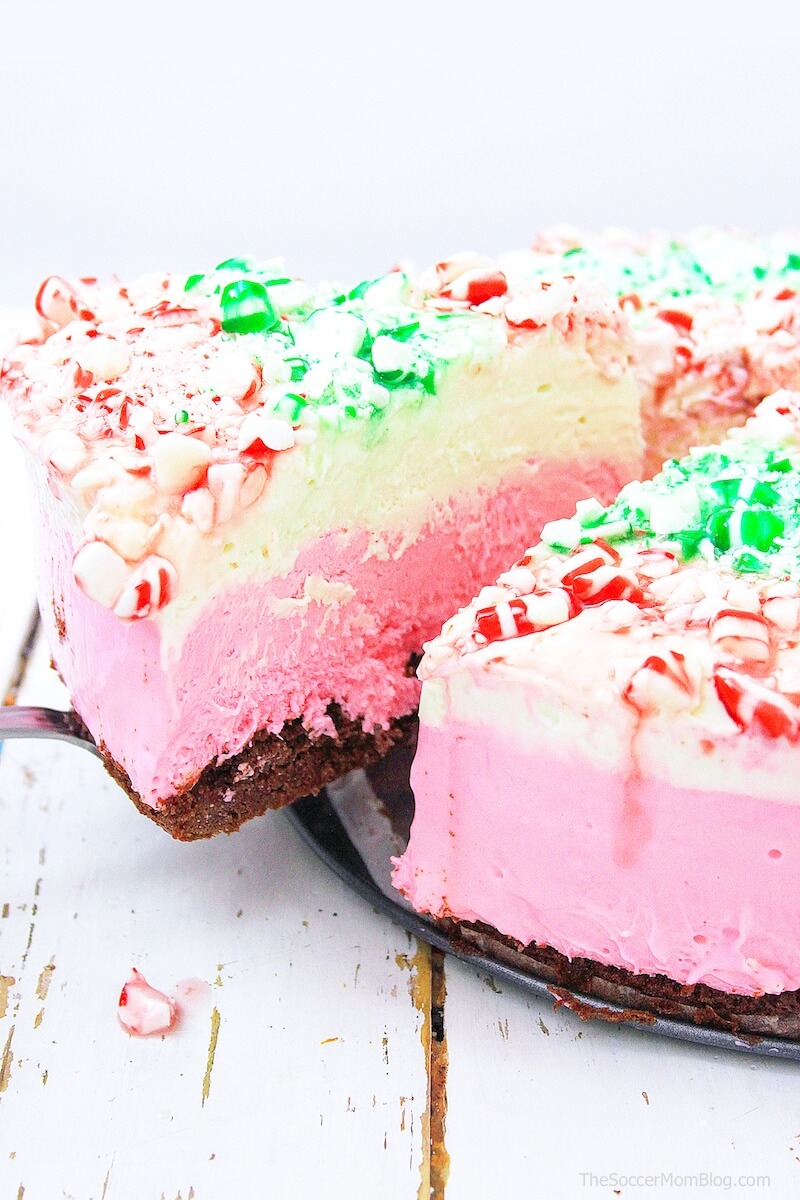
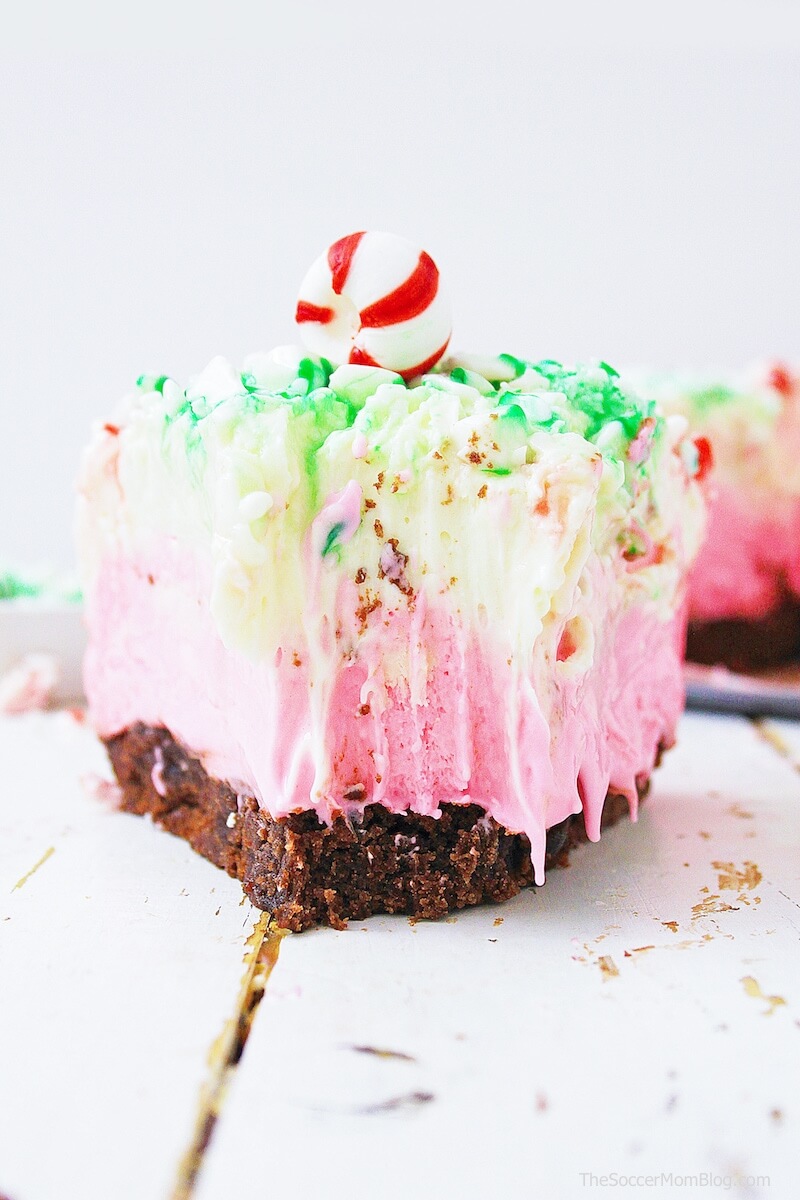
After cheesecake is set, scoop the white batter on top of pink layer. This cheesecake is so rich it almost tastes like white chocolate…yum!!

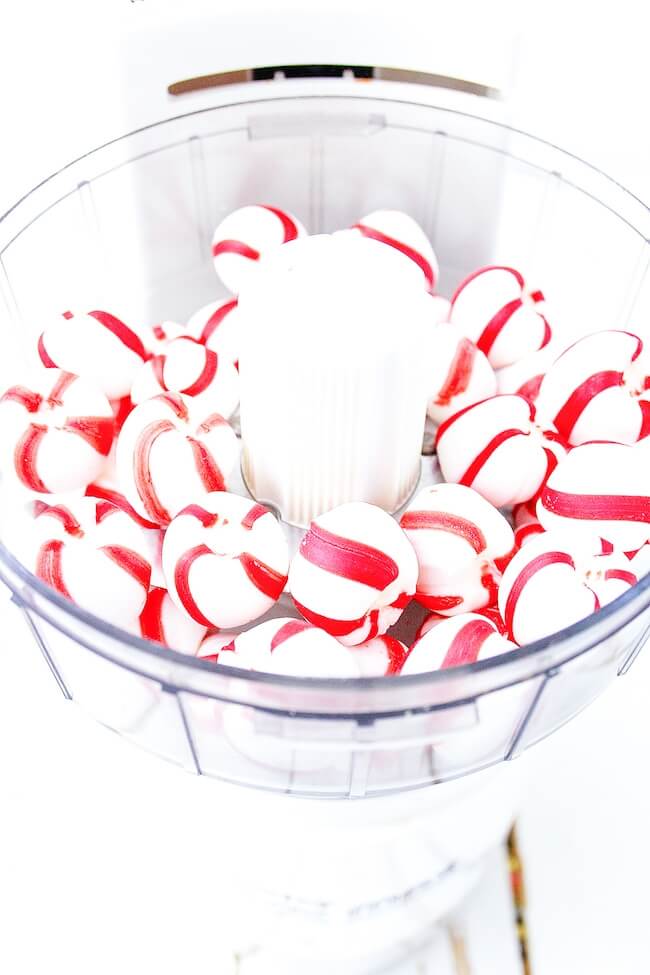
Crush your red and green peppermints separately, to keep the colors from mixing. You can use a food processor or a rolling pin for this step — both work well!
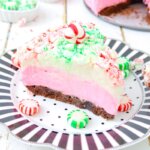
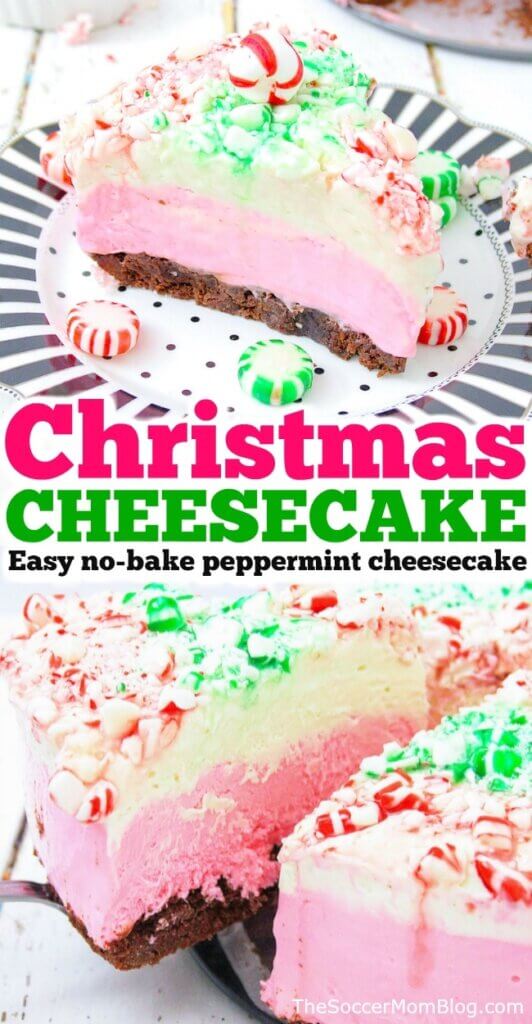
Make a ring of crushed red peppermints around the perimeter of the top of the cheesecake. Then make a ring of green peppermints. Finally, fill the center of the top of the cheesecake with crushed red peppermints. It should look a bit like an archery target or a bullseye.
Place the cheesecake back in the freezer for at least 4 hours, or overnight for best results.
How to Store Your Peppermint Cheesecake
While we recommend serving within 24 hours for the best results, you can enjoy your Christmas cheesecake for up to a week.
Simply cover and keep in the freezer between servings.
More Christmas Recipes
- Christmas Wreath Cupcakes
- Christmas Tree Oreos
- Mini Santa Belly Cakes
- White Chocolate Peppermint Cookies
- Kid-Made Mini Gingerbread House Cakes
- Oreo Gingerbread Truffles
- Rudolph Cupcakes
- Copycat Starbuck Cranberry Bliss Bread
- Christmas Puppy Chow
- Peppermint Brownie Truffles
Christmas Cheesecake Recipe:
If you like this recipe, please rate it! We’d also love to hear your thoughts in the comments below.
Want to Save This Recipe?
Enter your email & I'll send it to your inbox. Plus, get great new recipes from me every week!
By submitting this form, you consent to receive emails from The Soccer Mom Blog
Christmas Cheesecake
Equipment
- 9-inch Spring-form pan
- Parchment paper
- 1 stand mixer
- Rolling pin
- Double zip plastic food storage bags
- Medium mixing bowl
Ingredients
For the Crust
- 1 Box Brownie Mix
For the Filling
- 48 oz Cream Cheese softened
- 1 cup Heavy Cream
- 1/2 cup Granulated Sugar
- 1 Tablespoon Cornstarch
- 2 1/2 cups Powdered Sugar
- 2 Tablespoon Vanilla
- 1 Tablespoon Lemon Juice
- Neon Pink Gel Food Coloring as needed
- 1/2 teaspoon peppermint extract
For the Topping
- Starlight mints, in Red Peppermint crushed
- Starlight mints, in Green Spearmint crushed
Instructions
To Make the Crust
- Preheat oven to 350° and prepare brownie mix according to package directions.
- Line the bottom of the Spring-form pan with parchment paper and pour half of the brownie batter into pan.
- Bake for 15 – 18 minutes, or until a toothpick inserted in the center comes out clean.
- Remove from oven to a wire rack to cool.
To Make the Cheesecake Filling
- Using a stand mixer with whisk attachment, blend the 6 packages of cream cheese until smooth.
- Add 1/4 cup heavy cream to the cream cheese and mix until smooth.
- Add granulated sugar, vanilla, and lemon juice, continuing to mix until smooth.
- Combine cornstarch to the powdered sugar in a small bowl, then add to the cream cheese mixture a little at a time, alternating with the rest of your heavy cream, until all the cream and powdered sugar have been added.
- Turn the mixer on high for 2 minutes, so the cheesecake filling is smooth and creamy.
- Pour just a little less than half of the cheesecake filling into a small bowl, and place in the refrigerator.
- Add neon pink food coloring gel to the bowl of remaining cheesecake batter, a couple drops at a time, until the batter is rich pink. Add peppermint extract and blend as needed until color is even and mint flavor is well incorporated.
- Pour the pink cheesecake filling on top of the brownie crust in your spring-form pan, then place the pan in the freezer for 3-4 hours.
- When 3-4 hours are up, remove your cheesecake from freezer and white batter from fridge. Pour the white layer on top of the pink layer, smoothing the top with a spatula.
- Place the cheesecake back in the freezer.
To Assemble and Decorate
- Place about 2 cups red mints (wrappers removed) into a gallon freezer bag and seal. Use a wooden rolling pin to crush the mints. Repeat with the same amount of green mints.
- Place crushed red mints on top of white cheesecake filling, around the outside.
- Place the green mints around the red mints, in a circle on top of the cheesecake filling.
- Place the red mints in the center of the cheesecake, finishing the top of the cheesecake with the mints.
- Place the cheesecake back in the freezer for at least 4 hours.
- Cheesecake can be kept in the freezer, covered, for up to 7 days.
Notes
Nutrition
Pin this Christmas Cheesecake Recipe on Pinterest:
Want more Christmas dessert ideas? Check these peppermint treats!
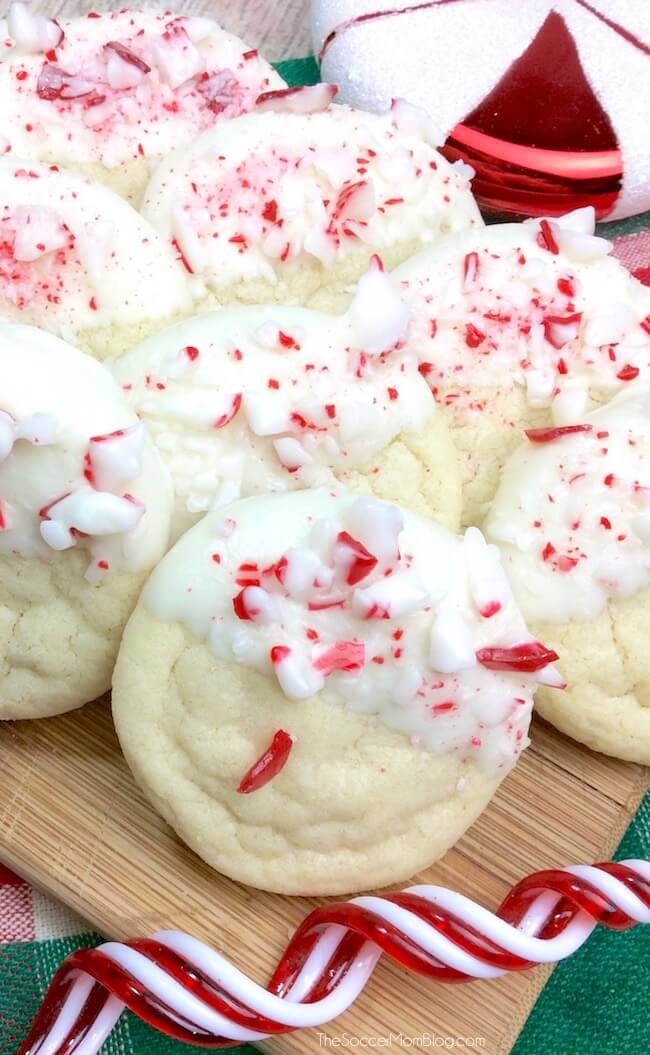
White Chocolate Peppermint Cookies
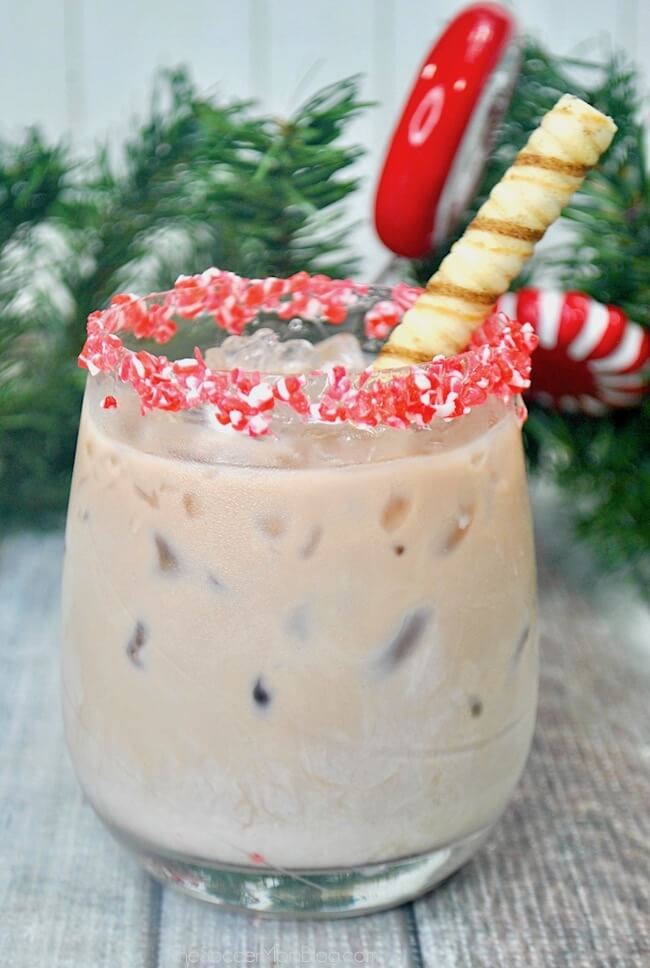
Tipsy Peppermint Mocha Cocktail

- Beach Day Rice Krispie Treats - June 23, 2026
- Pickled Jalapeños Recipe - June 15, 2026
- Homemade Nesquick Mix - June 11, 2026